Telegram Co Documentation

Creating automated catalogs

Automated Catalog Design Principles

Automating a catalog allows you to save elapsed time and reduce direct labour costs, while at the same time increasing accuracy and allowing you to create a more engaging catalog for your customers.

Your automated catalog solution has been designed using EasyCatalog – the industry leading InDesign plugin for creating catalogs, brochures and other automated content. Learn more about EasyCatalog in our Introducing EasyCatalog guide.

In order to achieve maximum benefits for your organisation, key functional areas need to understand the catalog workflow and contribute to the process. This includes middle/senior management, finance, product managers, marketing and your graphic design/layout team.

Lean more about the different workflow components in our Designing your automated catalog workflow guide.

New team members or less-experienced EasyCatalog users may also like to refer to our Getting started with your automated catalog guide.

Using modular and scalable design methods within InDesign

An automated catalog solution works best when content is considered in a holistic manner – including content sourcing, progressive updates, consistency of images, product hierarchy and category structure.

Don’t repeat yourself (D-R-Y)

A key design philosophy for both data management and ongoing production is to reduce (or remove completely) the repetitive manual editing of automated catalog pages and other duplicated effort.

Managing images

Images may be automatically placed within your catalog. Learn more about image options in our detailed Picture content – Manage images & placement guide.

Supplementing your design with manually created content

Non-standard content may be added to selected pages to enhance the overall catalog. Consider adding this content to consistent locations (e.g. opposite the opening page for each catalog chapter).

EasyCatalog Library & Master Page Setup

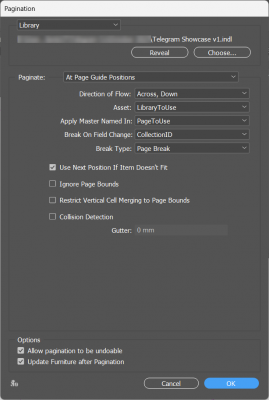
Automated content is created utilising the ‘Paginate At Page Guide Positions’ method. Each product or product collection is added after the preceding one in a single text frame.

Learn more in our Creating automated content using ‘Paginate At Page Guide Positions’ guide.

Library Design

The EasyCatalog Library contains pre-design content which is merged with your product data to create catalog pages automatically.

Library Elements

Each component of an EasyCatalog library is known as a library element. A simple EasyCatalog library may contain a single element, while a more complex layout may comprise ten or more elements.

Learn more about library elements in our Creating and editing your EasyCatalog library guide.

Pagination Rules

Pagination Rules are used to control how a library element is repeated to create catalog pages. Pagination Rules may be applied to the whole library element, or to individual elements within the library (e.g. if an image frame is to be removed when there is no image to display).

Learn more about Pagination Rules in our Controlling automated content with Pagination Rules guide.

Master Page Setup

Master Pages are used to control how a page is designed, including the primary text frame or grid layout.

Page Furniture

Page Furniture comprises items used to aid navigation (e.g. coloured tabs, headings and page numbering). These items are controlled by EasyCatalog and are usually based on the first (or last) product record shown in a page.

EasyCatalog Principles

The following reference information is provided to explain key EasyCatalog principles for the automated catalog production project.

Managing library updates

For a simple EasyCatalog library comprising a single element, the library may be edited by dragging the element onto the page. (If the library is merged with data, pressing Ctrl + Z (Windows) or Apple + Z (Mac) will show the unmerged library.)

For a more complex EasyCatalog library we suggest you maintain either a master page (e.g. named Z-Template) with all library elements clearly labelled, or a separate InDesign document.

Managing more complex EasyCatalog libraries requires some diligence, especially when many libraries contain similar content. There is currently no way to easily share similar content between libraries.

Read more about how to edit your library in our Updating your EasyCatalog library guide.

Managing data updates

EasyCatalog includes powerful functionality, including the ability to update data on the page if the source data is refreshed. However, it is very important to understand the limitations of EasyCatalog, including how and when information can be updated onto the page, or whether the catalog (or part of the catalog) should be repaginated.

As a general rule, when new content is required (e.g. a new product has been added) or when content is to be removed (e.g. a product has been deleted), the catalog should be repaginated. When a product attribute (e.g. a product description or price) has been updated then data may be updated on the page.

Read more about whether to update or repaginate in our Managing data updates guide.

Opening EasyCatalog documents on other computers

EasyCatalog adds significant functionality to InDesign documents. Opening an InDesign document which includes EasyCatalog content using a computer which doesn’t have EasyCatalog installed can cause issues, for example breaking the link between product data and the content. This may prevent content being updated in future or remove the ability to create indexes or update page furniture. Learn more about how to prevent this occurring using our Opening EasyCatalog documents on other computers guide.

Document Setup

If you have engaged Catalog Automation to undertake initial solution design, you will normally be provided with an InDesign document containing the required master pages and styles.

Master Page Setup

Master pages allow frequently used page templates to be reused within the catalog. Master page styles can be inherited from other master pages, allowing key information to be maintained in a single location.

Styles

Using styles allows you to create consistent content, and to apply any changes across all similar content within your catalog.

Styles are typically named according to the relevant content section. No non-styled content should be placed on a page.

Paragraph styles

Paragraph styles allow all text within a paragraph to be formatted in the same way. This includes font name, height, spacing and indents. Learn more about paragraph styles Paragraph styles.

Character styles

Character styles are used to override individual words (or sometimes sentences) within a paragraph, for example to display some words within a paragraph in a different colour. Learn more in our What’s the difference between a paragraph style and a character style? guide.

Table styles

Table styles are used to manage to overall look and feel of a table, including borders, alternate row highlighting and other formatting.

Cell styles

Cell styles allow table cells to be formatted consistently. Disappointingly, InDesign does not support setting or changing the size of columns or rows via styles.

Object styles

Object styles allow styling of multiple content types (e.g. paragraph styles, cell styles) within a consolidated style.

Advertisements & other content

On page notices, advertisements and other fillers should be maintained within a separate InDesign library file. Typically this content is stored using InDesign’s Word Wrap feature to ensure that product content flows around the advertisements. These assets can then be dragged from the library and placed within any of the required content files. Read more in our detailed Maintaining a library of advertisements and fillers guide.

Data Sources

Product data is maintained by the Ladelle team.

Grouping

Product data will be grouped:

  1. Brand Description
  2. Item Group Cleaned
  3. Range Description
  4. PageNumber

Learn more about grouping your data in our Group – Manage data hierarchy guide.

Learn more about using configurations in our detailed Configuration – Manage appearance of panel guide.

Filtering

Filtering is used to restrict the data within your EasyCatalog Panel, for example for all products not marked as Inactive.

Picture Options

Images can be imported from a location you define, such as a folder or by specifying a URL on a web server. Formatting of images including fitting and cropping may also be controlled for each field.

Loading/refreshing data

Data needs to be updated within the EasyCatalog panel before it can be used to create automated content.

The process for updating data within the EasyCatalog panel is the same regardless of the file type being used (e.g. CSV, Excel, XML).

Learn more about loading and updating data in our detailed Loading or updating data in an EasyCatalog panel guide.

Learn more about managing data updates in our detailed Managing data updates guide.

Creating Automated Catalog Pages

Catalog Body

Creating automated content

  1. Choose the desired configuration from the EasyCatalog panel flyout menu. The relevant configuration is clearly listed in the associated Pagination Reference guide.
  2. Drag the desired master page into the preferred location within the document.
  3. Select the required data from the EasyCatalog panel.
  4. Choose Paginate from the EasyCatalog panel flyout menu.
  5. Choose the desired library. The relevant library is clearly listed in the associated Library Reference guide.
  6. Ensure the Pagination options (e.g. Paginate, Asset Name, Break On Field Change) are set as shown in the associated Pagination Reference guide.
  7. Click OK. The content should take 1-5 minutes to appear depending on the size of the data selected.
  8. Spot check the content to ensure all categories and products appear in the correct order.

Table of Contents

Creating a detailed table of contents is easy.

  1. Choose the desired configuration from the EasyCatalog panel flyout menu. The relevant configuration is clearly listed in the associated Pagination Reference guide.
  2. Place the cursor in the desired text frame on the page.
  3. Select the required data from the EasyCatalog panel.
  4. Choose Paginate from the EasyCatalog panel flyout menu.
  5. Choose the desired TOC library. The relevant library is clearly listed in the associated Library Reference guide.
  6. Ensure the Pagination options (e.g. Paginate, Asset Name, Break On Field Change) are set as shown in the associated Pagination Reference guide.
  7. Click OK. The content should take less than one minute to appear depending on the size of the data selected.
  8. Spot check the content to ensure all categories and products appear in the correct order.

Book Management

Long documents within InDesign are typically managed using book files. A book file allows individual InDesign Documents to be edited separately and combined for printing. Elements such as page numbering, styles, swatches and master page design can then be managed across the entire document.

The benefits of book files include faster file opening and better performance, as well as allowing different users to edit parts of the book at different times. For more information regarding managing your catalog as a book files please refer to:

Finalising your catalog

Once you are done with creating your automated catalog pages and have created your cover, table of contents, welcome pages etc you will need to export your catalog as a print-ready PDF.