Search more than 200 articles to learn more about creating and automating your product catalogs
Tip: Start typing in the input box for immediate search results.
Attributes – Manage setup of attributes
Producty® allows you to set up your product attributes to suit your products and product range.
Generally, each attribute should contain one piece of product information (e.g. a width value, height value or price).
Producty® also includes enhanced functionality allowing you to store attributes against a standard product record, a specific catalog record or even a specific instance of a product within a catalog; as well as the ability to concatenate multiple attributes for display within a virtual attribute.
Location
The Attributes tab is accessed via the Setup menu.
Viewing attributes
When the Attributes tab is first opened a list of all current attributes is presented. Selected attribute options are shown, along with Edit and Delete buttons.

Editing or deleting an attribute
Editing attributes
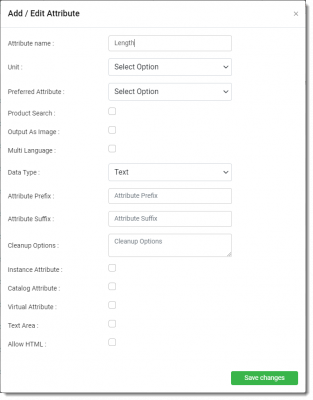
To edit an attribute click the appropriate Edit button shown within the list of attributes. A dialog will pop up.

Edit the attribute name by altering the name shown within the text box. Select which unit is associated with the attribute via the dropdown list.
Choose Save changes to confirm the values shown.
Deleting attributes
To delete an attribute click the appropriate Delete button shown within the list of attributes.
Warning: Deleting an attribute will also delete any corresponding product attribute values configured to use this attribute.
Adding an attribute
Prior to an attribute being associated with a category or collection the attribute record needs to be created.
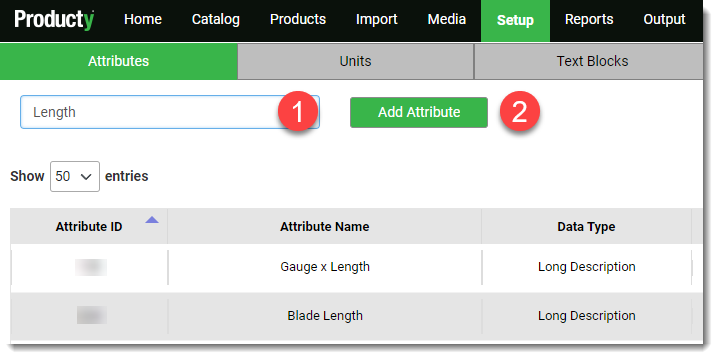
- Type your desired attribute name in the field – the list will filter to similarly named attributes.

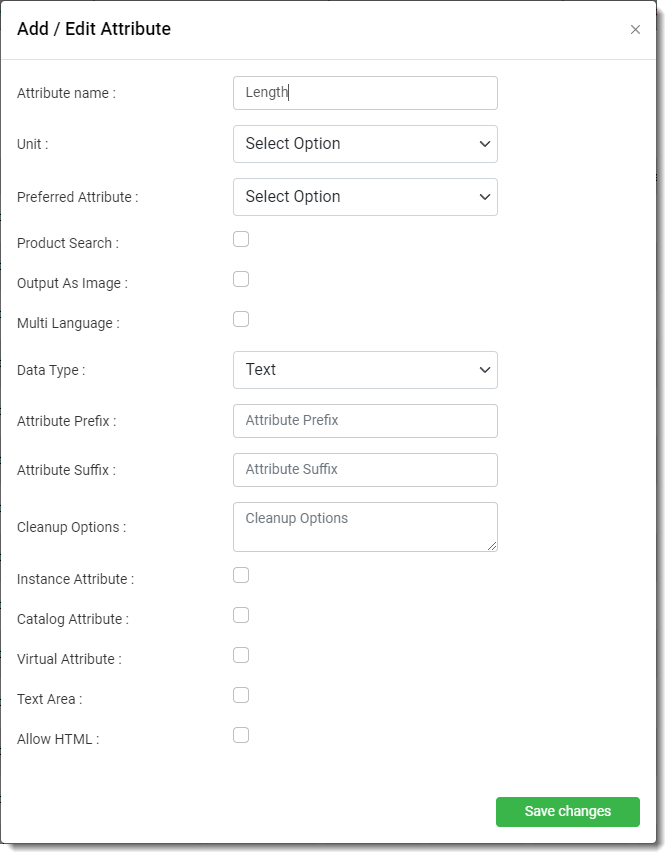
- Check that your attribute name doesn’t already exist (or that you can’t use an existing attribute for this product data) and choose Add Attribute. A dialog will popup. Choose any desired characteristics – e.g. unit, data type, etc) and select Save changes. Your new attribute will be added to the list.

Producty® does not allow multiple attributes with the same name, nor can an attribute name be blank.
Attribute options
Attribute name
The attribute describes a piece of information about your product. For instance, if your product is a pencil box, it will have three dimensions – height, width and length. Each of those three is an attribute. Your pencil box may also come in red, blue and green, so color would also be an attribute in this case.
When creating and naming an attribute, it is best to keep your names short, as long as they convey the required information. In our pencil box example, ‘length’ provides ample information, as we already know we are referring to a pencil box. Using ‘pencil box length’ or even ‘box length’ would be unnecessary.
Unit
The unit describes a quantity or feature used by particular attribute. For instance, the length of your pencil box might be best measured in centimetres, as might its width and height. Your unit, therefore would be centimetres or, more likely, its abbreviation cm.
Note that the unit is not the value of your attributes. If you pencil box is 24 centimetres in length, the attribute is length, the unit is centimetres (or cm) and the value is 24. If your product range includes pencil boxes that are 18 cm and 21 cm, the values are 18 and 21 but the unit remains the same, i.e. cm.
When entering values such as length, it’s important to enter the value only and not the unit. If you have three pencil boxes of different width, say 15 centimetres, 18 centimetres and 24 centimetres, you would enter only 15, 18 and 24. Because you have designated centimetres as a unit, the cm can be drawn from there and used to generate a list that displays 15 cm, 18 cm and 24 cm if required.
Entering the values as 18 cm and 24 cm would also mean the data would be read as text and prevent changes in decimal place displays and sorting by number.
Not every attribute will have an associated unit. In our pencil box example, color will have values, such as ‘red’, ‘blue’ and ‘green’ but there will generally be no unit associated with color.
Preferred Attribute
When setting up an attribute, you will have the option of designating it as a preferred attribute. A preferred attribute is one that you will likely consider a priority to display, and that you will use for most of your data, for example Product Name, Product Description or Price. We recommend designating up to five attributes as preferred attributes.
Once you have setup preferred attributes, when editing a Product you will be able to select the Preferred radio button and display only the preferred attributes. This can be particularly useful for products that have many attributes where the preferred attribute list allows you to focus on comiling must-have data.
Product Search
By checking the Product Search box, you will turning on this particular attribute and appending it to the Product Code that uses that attribute. This append the attribute to the product code, which in turn will allow you to search for product codes using this attribute using the attribute name.
[Will need to see an example of this] Used in grid search
Output as Image
Selecting the ‘Output as Image‘ checkbox will enable you to configure the product as an image. Prior to configuring an image you will need to have set up your images and their sizes set up. This is done via the Media > Media Setup tab. If your product is not intended to be displayed as an image, leave this checkbox unchecked.
[Any implications for checking this for products that don’t have an image? Is an error/warning message required?]
Multi Language
[??]
Data Type
This dropdown selection box will allow you to select the type of data you will be displaying. If your attribute is color, for instance, and the colors available are red, green and blue, you will select Text as your data type. If your data type uses descriptions (more than XXX characters) select Long Description.
If your attribute is length, and will be using only whole numbers, such as 12, 18 and 24, you will select Number as your data type. For attributes that use decimal places (currency for instance), select Decimal.
For a full list of the available data types and their applications, click here. [Or should the full list and explanations reside here?]
Attribute Prefix
Attribute Prefix allows you to add text that will be displayed before the attribute that will provide further information relating to that attribute. One example would be ‘$‘ for an attribute of Price.
Attribute Suffix
Attribute Suffix provides the same functionality as Attribute Prefix but, as the name suggests, will display after the attribute. For example if the product attribute is applicable only in a certain country your suffix might be something like ‘(US only)’.
[Are these in the ballpark as examples?]
Cleanup Options
This function allows you to ‘clean up’ your data. For instance it can search and find double spaces and replace them with single spaces. This function uses specific syntax to allow such data manipulation, a guide to which is available here.
As well as being a standard attribute, your attribute can be additionally classed as an Instance Attribute, a Catalog Attribute and/or a Virtual Attribute.
Catalog Attribute
A Catalog Attribute will be one which is likely to vary from catalog to catalog. For instance, for a yearly catalog, price is something that could change from one edition to the next.
Instance Attribute
An Instance Attribute allows an even more specific allocation to be made. For example a Ford MH fan belt may be able to be fitted to a Holden VL Commodore engine.
[Don’t fully understand this yet]
Virtual Attribute
A Virtual Attribute allows you to concatenate (combine) two or more attributes into a single ‘virtual’ attribute. An example of this would be an attribute Dimensions, which combines the three attributes of Length, Width and Height.
Virtual Attributes are an extremely useful and important tool in catalog setup as, used correctly, they can drastically reduce the need for repeat input of data.
Text Area
As the name suggests Text Area provides an extra space for adding further text, including the option of using ‘soft’ carriage returns.
Allow HTML
Using HTML allows a product attribute to be created through an HTML editor, which in turn allows for extra flexibility in display data and text, such as displaying it in bold or italics, or via bullet points or numbering. To use this functionality on an attribute, you will select the Allow HTML checkbox.
Types of attributes
Producty® supports different attribute classes:
Standard product attributes
Catalog attributes
Instance attributes
