Search more than 200 articles to learn more about creating and automating your product catalogs
Tip: Start typing in the input box for immediate search results.
Creating automated content using ‘Paginate At Positions Specified In The Data’
This guide has been created to explain the steps required to use the EasyCatalog Paginate > At Positions Specified In The Data option for creating automated catalog pages.
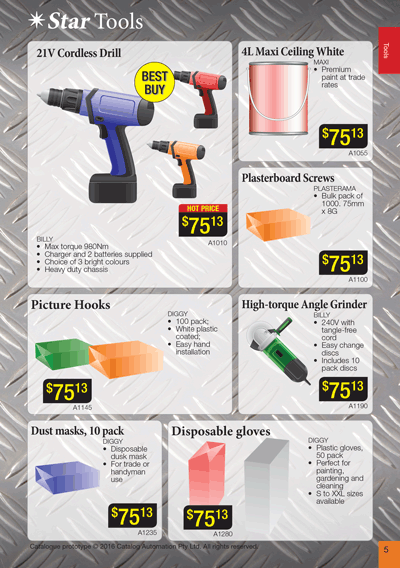
Grid-based catalogs
Grid-based catalogs arrange products (or collections of products) in a flexible, hierarchical page view. The underlying grid may be a regular 3×4 or 4×5 matrix; or you may choose to utilise a composite 12×12 matrix to allow for a very flexible page design.
With this flexibility comes additional data requirements – especially for more complex layouts – as the differences in templates need to be specified.
Grid-based catalogs are typically used for more visually intensive products including retail (e.g. tool shops & supermarkets) and wholesale (e.g. food supplies, homewares, education supplies).
Creating a grid-based catalog requires a lot of pre-planning to setup. For more complex designs you will need to be able to flexibly store and retrieve both the height and width of each page element, as well as their location (in either absolute or relative terms).
If you’re not sure which layout type and automated pagination method best suits your catalog requirements you may like to read our Choosing a flow-based or a grid-based catalog layout guide.
How it works
EasyCatalog will create your catalog content by merging your data with your pre-designed library content. It will add content for each product or product group onto the page at positions which have previously been setup within your data source. Using this method you can quickly create a catalog (or catalog chapter that is 50-100 pages, or more).
Setup required
This guide assumes you already have a working version of EasyCatalog and have pre-configured your EasyCatalog panel, created your InDesign document and setup your EasyCatalog library.
EasyCatalog software
You will need to have downloaded and installed EasyCatalog (a valid trial version is fine). Creating automated pages with EasyCatalog requires installation of the EasyCatalog Pagination Module.
Loading data to the EasyCatalog panel
Product data will need to be loaded to your EasyCatalog panel. Your data fields may need to be configured to reflect your required data types and product images will need to be set up. Your data will need to contain a number of specific fields regarding the height, width and page position of your page elements.
InDesign template document
Automated catalogs are typically created into a pre-configured InDesign document. Paragraph styles, table style, colour swatches and other commonly used elements are set up ready for use.
EasyCatalog library
Your library will need to be setup with required content linked to the fields within the EasyCatalog panel. Typically a grid-based catalog requires at least one library element for each of the different sized elements used on the page.
Creating automated catalog pages
Selecting your data
-
- Drag the desired master page from the Pages panel to create a new page.
- Select your required product data and choose Paginate… from the EasyCatalog Panel flyout menu.

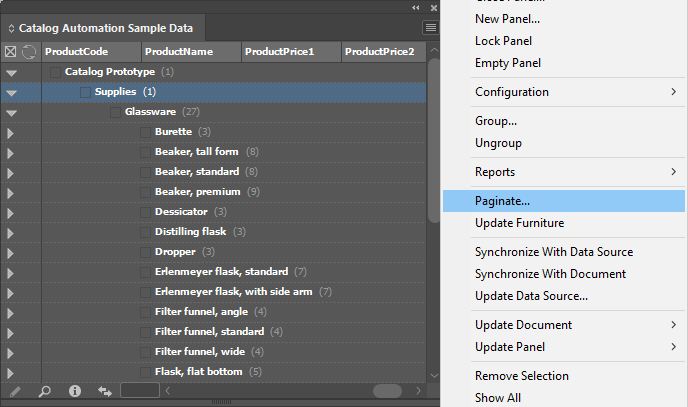
Setting pagination options
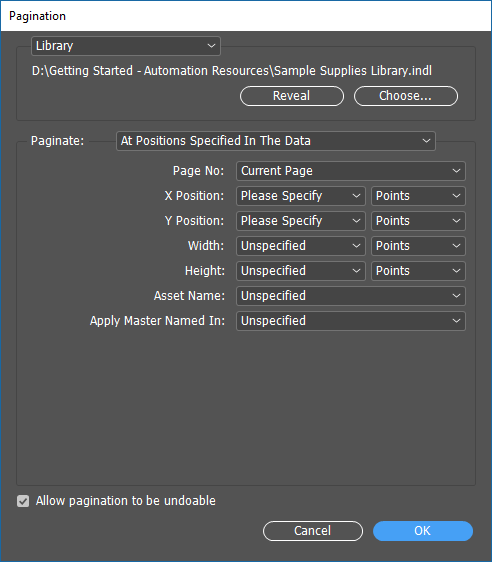
- The Pagination dialogue will display. Ensure Library is set in the top-most dropdown menu.

- Select Choose… and navigate to your desired EasyCatalog library.
- Ensure the Paginate: dropdown is set to At Positions Specified In The Data.
- Select additional options as required depending on your library setup and catalog complexity:
Element Description Page No Select the field name which contains the page number upon which the product (or collection) should be placed.
This field should be define as a Number within Field Options > Format.
Specifying the Page Number is Recommended.
X Position Select the field name which contains the horizontal (X axis) location where the product (or collection) should be placed.
This field should be define as a Number within Field Options > Format.
Also choose the corresponding unit value (typically Millimeters, Inches or Points).
Specifying the X Position is Required.
Y Position Select the field name which contains the vertical (Y axis) location where the product (or collection) should be placed.
This field should be define as a Number within Field Options > Format.
Also choose the corresponding unit value (typically Millimeters, Inches or Points).
Specifying the Y Position is Required.
Width If your library elements are suitable for resizing, select the field name which contains the horizontal size (or width).
This field should be define as a Number within Field Options > Format.
Also choose the corresponding unit value (typically Millimeters, Inches or Points).
Specifying the Width is Optional.
Height If your library elements are suitable for resizing, select the field name which contains the vertical size (or height).
This field should be define as a Number within Field Options > Format.
Also choose the corresponding unit value (typically Millimeters, Inches or Points).
Specifying the Height is Optional.
Asset Name Select the desired field name if the EasyCatalog panel contains a field specifying which library element to use.
You may choose to setup a specific field within your data source to choose the desired library appearance; or you could base the field on an automated choice (e.g the frst 4 items of a sub-category are to be larger than the remaining items).
Unspecified is the default value. If set as Unspecified, Pagination Rules will typically need to include Actions to allow different library elements to be paginated.
Specifying the Asset Name is Optional.
Apply Master Named In Select the desired field name if the EasyCatalog panel contains a field specifying which mater page to use.
Unspecified is the default value. If set as Unspecified, additional pages will be inserted using the current master page.
Specifying the Apply Master Named In value is Optional.
Allow pagination to be undoable Selecting this option allows you to undo the pagination using Ctrl+Z (Windows) or Apple+Z (Mac).
You may experience a slight reduction in performance when using this option, depending on the size and complexity of your catalog document.
- EasyCatalog will create automated catalog pages by merging your product data with your EasyCatalog library.