
Search more than 200 articles to learn more about creating and automating your product catalogs
Tip: Start typing in the input box for immediate search results.
Creating simple tables with EasyCatalog
Simple product information tables
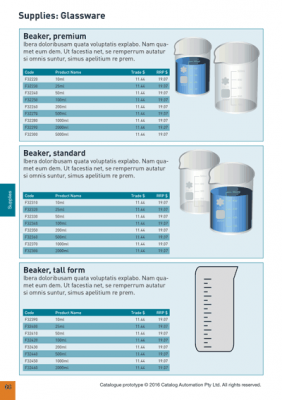
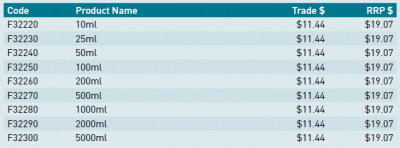
Tables are an integral part of most product catalogs. In their simplest form, tables demonstrate each of the products within a product collection, including:
- Product code/SKU
- Product name or simple description
- Basic product attributes (e.g. length, width, height)
- Price
Tables and EasyCatalog
EasyCatalog is able to quickly and efficiently convert product data into simple tables, creating a table row for each product record within the data.
EasyCatalog is also able to handle hierarchical data within a table, allowing you to place summary data at a parent category level (or levels) and then create a row below for each product record.
Beyond the simple tables shown within this guide, EasyCatalog also supports the creation of more complex tables. View our Which table design is right for my catalog? guide if you need help determining which table style to use.
Before you proceed
- InDesign document
- Idea of proposed layout
- EasyCatalog panel already setup
- Product data (a sample will do if not final)
Data hierarchy
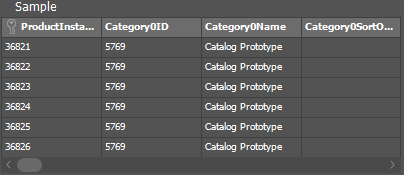
A typical table will include product information for each record contained within your data source. If you’re using a file-based data source (e.g. Excel or CSV) then this translates to each row of your spreadsheet. (For more complex data, a record is the terminal level of the hierarchy. The unique field specifier selected when the panel was originally setup describes this level.)
Creating an EasyCatalog ready table
Design your table
- Insert (or copy) a regular InDesign table.
- Adjust the column widths to fit your proposed content.
- Make the top row a header row by going to Table > Convert Rows > To Header.
Insert Field Specifiers
- Position your cursor
- Right click on appropriate field and choose Insert Field Specifier. If the Insert Field Specifier option is not available you may need to check that the cursor is correctly located within your table. You may also need to move outside an existing field specifier – EasyCatalog can’t insert one field specifier inside an existing one.
Style table as required
The EasyCatalog field specifiers may be styled as required. A majority of this formatting will be undertaken with InDesign’s native functionality, though some items are enhanced using EasyCatalog’s specialised table management functionality.
We strongly recommend you use a new paragraph style for each different text element. (You may choose to inherit common properties using InDesign’s Based On feature.) Additionally, InDesign supports both cell styles and table styles to encourage additional consistency across tables – though it’s worth pointing out there is no specific column style so setting column widths can’t be done using styles.
Alternate row shading
Shading alternate rows of a table can make it easier for readers of your catalog to understand information presented in multiple columns.
Row shading is managed within InDesign by going to Table > Table Options > Alternating fills. Setting up the alternating fills within the EasyCatalog library will add the alternate fills to a whole EasyCatalog driven table. Alternating fills should be saved as a table style.
Merging cells with matching values
Merging cells where the same attribute values exist for multiple products is a great way of reducing the number of data points that a catalog reader needs to read in order to understand your product range.
If you’d like to simplify the information displayed to merge common cells together, simply select the cells you’d like to merge and go to Table > Cell options on the EasyCatalog Panel flyout menu.

Horizontal Merging
Choose either Merge With Next If Content Matches or Merge With Next If Content Matches (Ignoring Empty Cells).
Vertical merging
Choose either Merge With Next If Content Matches or Merge With Next If Content Matches (Ignoring Empty Cells).
Hiding/deleting unused columns
Hiding unused columns makes it easy to use a single table design throughout your catalog. If a product collection doesn’t include values for a specific attribute, then the entire column may be omitted on a case-by-case basis. EasyCatalog will also allow you to control if/how the space is shared across the remaining columns.
For highly efficient tables, read our separate article to learn more about advanced data management for EasyCatalog tables.
Saving your table in an EasyCatalog library
The following instructions are a simplified version of the complete EasyCatalog library setup details suited to explain how a simple table should be setup for a typical table-based catalog.
Configure Pagination Rules
Once you have designed your layout template, you need to add Pagination rules – the settings used by EasyCatalog to control how a library is inserted/repeated as it is merged with selected product data. Pagination rules are typically added to the outermost text frame containing the table and other text. At a minimum, set as follows:
- Paginate option should be set to Once per group and the group level set at the product collection level (i.e. the final category level which contains the product records required in the final table)
- Insert option should be set as Frame contents to run collection text and product tables into a single text frame.
Learn more about the different pagination rule settings in our Pagination Rules reference guide.
Add to library
After the relevant Pagination rules have been configured, the content needs to be added to a new (or existing) EasyCatalog library.
To create a new library go to File > New > EasyCatalog Library. Save the library with a descriptive name in a logical place in your catalog project folder (but never save your libraries in your EasyCatalog WorkSpace folder!).
To add your content to your library, select the outermost text frame (where you applied your Pagination rules above) and choose Add item from the menu within the specific EasyCatalog library.
Learn more about adding and updating library elements in our Creating and editing your EasyCatalog library guide.