Search more than 200 articles to learn more about creating and automating your product catalogs
Tip: Start typing in the input box for immediate search results.
Getting started with Producty®
Introducing Producty®
Producty® is a fully-featured product information management solution designed with catalogs in mind.
Something else
Producty® is designed to export product information in a consistent and predictable format for use within EasyCatalog – an InDesign plugin which creates automated content based on pre-determined layout templates and structured data.
Read more about the many features Producty® brings to product management and catalog creation on the Producty website.
The following is a sequential overview of key concepts, with links elsewhere.
Creating your first catalog with Producty®
This introductory article will focus on creating a simple data set suitable for the creation of part of a typical catalog page. You will be taught how set up each of the required elements in a logical order.
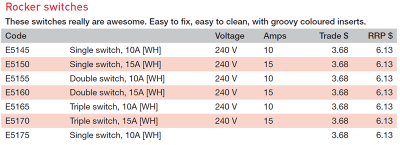
You may wish to create this data as you work through this article or use a similar example from your own catalog.
User setup
To access Producty® you will need to be invited to create an account and for that account to be associated with your Organisation.
Catalog setup
A number of elements require setup before a catalog can be effectively managed using Producty®.
Creating a catalog
This process is currently undertaken by your Catalog Automation account manager.
Select catalog
When you access Producty® for the first time you may need to select your active catalog (Some browsers will not register your choice automatically).
Navigate to Master Setup > Select Catalog and choose your Catalog from the dropdown. Your browser will then load the correct catalog and you may continue with setting up and managing your catalog.
Creating units
Producty® allows you to create a list of units which may be associated with one or more attributes. Associating a unit with an attribute can help your product managers maintain your product attribute data by ensuring product attributes are entered consistently across your product range. The use of units is optional.
Worked Example
- Navigate to Master Setup > Units
- In the Unit field, type “V” and click Add Unit. In the Add/Edit Units box, V will be displayed in the Abbreviation field.
- Type “Volts” into the Description field.
- Click Save Changes.
- In the Unit field, type “A” and click Add Unit. In the Add/Edit Units box, A will be displayed in the Abbreviation field.
- Type “Amps” into the Description field.
- Click Save Changes.
You have now created the units required for this exercise.
For more information on managing templates refer our detailed Units – Manage setup of units guide.
Creating product attributes
Producty allows you to associate an infinite number of product attributes against your product records. For a simple catalog you may only wish to display product code, description and price; while for a more complex technical catalog you may require numerous product attributes including product code, length, width, height, capacity, voltage, power output, heating/cooling, type, pack size, packaging type, trade price and RRP.
With the exception of the ProductCode attribute (which is created when your catalog is setup), each of these attributes needs to be setup before you can record attribute values against a particular product. Navigate to Master Setup > Attributes, type your desired Product Attribute name in the text field and choose Add Attribute. Your new product attribute will be added to the list. You can now add this product attribute to one or categories within your catalog – this will be explained in more detail later in this article.
Worked Example
- Navigate to Master Setup >Attributes
- In the Attribute field, type “Voltage” and click Add Attribute. In the Add/Edit Attribute box, select V from the dropdown. Click Save Changes.
- In the Attribute field, type “Amps” and click Add Attribute. In the Add/Edit Attribute box, select A from the dropdown. Click Save Changes.
- In the Attribute field, type “Trade” and click Add Attribute. Click Save Changes.
- In the Attribute field, type “RRP” and click Add Attribute. Click Save Changes.
You have now created the required product attributes.
For more information on managing product attributes refer our detailed Attributes – Manage setup of attributes guide.
Creating category text blocks
Producty allows you to create an infinite number of text blocks to display text at one or more levels in your catalog hierarchy. For example you may wish to include introductory text and images for each of the top level (Category1) categories within your catalog, along with more detailed range information describing each collection.
Each of these text blocks needs to be set up for use in your catalog before you can associate it with one or more categories.
Navigate to Master Setup > Text Blocks, type your desired Text Block name in the text field and choose Add Text Block. Your new text block will be added to the list. You can now add this text block to one or more categories within your catalog – this will be explained in more detail later in this article.
Worked Example
- Navigate to Master Setup > Text Blocks.
- In the Text Block field, type “Description”.
- Click Add Text Block.
Your text block has now been created.
For more information on managing text blocks refer our detailed Text Blocks – Manage setup of text blocks guide.
Creating templates
Producty allows you to specify different layout templates for different categories or collections within your catalog, enabling product managers and other team members to pass on key layout information to the design team early in the project.
With the exception of the Default attribute (which is created when your catalog is set up), each of these templates needs to be set up before you specify a different template for a category or collection.
Navigate to Master Setup > Templates, type your desired Template name in the text field and choose Add Template. Your new template will be added to the list. You can now add this template to one or more categories within your catalog – this will be explained in more detail later in this article.
Worked Example
We will not be creating templates in this exercise.
For more information on managing templates refer our detailed Templates – Manage setup of templates guide.
Adding products
Product records need to be added to Producty before you can add products to a catalog.
Navigate to Manage Products > Product List, type your desired Product Code in the text field and choose Add Product. Your new product will be added to the list. Importantly, Producty does not allow multiple products with the same product code, nor can a product code be blank.
Worked Example
- Navigate to Manage Products > Product List.
- In the Product Code field, type “E5145”. Click Add Product.
- Repeat step 2 for each of the following codes: E5150, E5155, E5160, E5165, E5170, E5175.
Your product records have been created.
For more information on managing products refer our detailed Products – Add products to catalog & manage product attribute values guide.
Importing products
Coming Soon.
Creating catalog structure
Introducing categories and collections
Once you have set up your product attributes and text blocks and created your product records you can begin to create your catalog structure within Producty®.
Categories create structure
The term category refers to any of the hierarchical elements used to create a catalog structure. Your may like to think of them as chapters and sub chapters of your catalog, or like folders and sub folders on your computer.
A category is displayed as a folder ![]() icon within the catalog tree.
icon within the catalog tree.
Collections contain products
The term collection refers to the terminal (i.e. last) level of a catalog structure. A collection is the only part of a catalog structure which contains product records.
A collection is displayed as a grid ![]() icon within the catalog tree.
icon within the catalog tree.
Categories vs collections…
| Categories | Collections |
|---|---|
|
|
Adding catalog categories
Your catalog chapters should be set up as top-level categories (Category1), with sub categories created underneath to suit your product range (Category2, Category3, etc). As a general rule a 100-page catalog should have a category structure 2 to 3 categories deep, while a 500-page catalog will probably require a category structure 4 to 5 categories deep. To assist your customers to navigate your catalog easily we suggest that each category should have no more than 10 children – instead you should separate these categories and create further categories (i.e. grandchildren) below the child categories.
To create a new category, go to Manage Catalog and click in the category tree on the parent category under which you wish to create a sub-category. Choose the Add button and enter the relevant Category Name and then choose OK (leaving the Collection checkbox unchecked). Continue on adding categories and sub-categories till you have a rough outline of your high level catalog structure.
Worked Example
- Navigate to Manage Catalog and click Add.
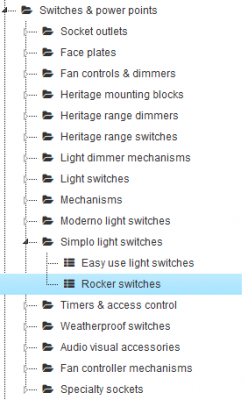
- In the Category Name field, type “Switches & power points”. Click OK.
- Click on the newly created Switches & power points category and click Add.
- In the Category Name field, type “Simplo light switches”. Click OK.
- Click on the dropdown arrow to the left of the Switches & power points category.
The Simplo light switches sub-category will be displayed.
Adding catalog collections
Once you have created your catalog structure you can add collections. A collection is the terminal level of the category structure and is the level of the category which contains links to the product records.
Worked Example
- Click on the newly created Simplo light switches category and click Add.
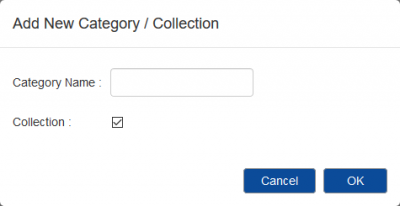
- In the Category Name field, type “Rocker switches”. Check the Collection checkbox. Click OK.
- Click on the dropdown arrow to the left of the Simplo light switches sub-category.
The Rocker switches sub-category will be displayed as a collection.
Reordering categories or collections
Categories and collections may be moved as required to rearrange the structure of your catalog.
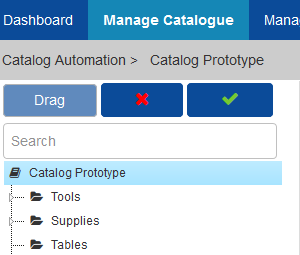
Navigate to Manage Catalog and select the category or collection you with to move in the catalog tree. Click Drag to enable editing of the tree structure.
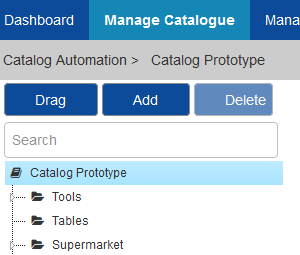
Click and drag the category or collection to its new location. A category or collection may not be dragged to below an existing collection. A collection represents the terminal level of the catalog hierarchy.
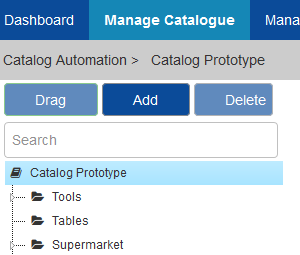
After you have released your mouse you will have the choice to accept the change by clicking the Green tick, to revert to the previous layout choose the Red tick.
Worked Example
We will not be reordering categories and collections in this exercise.
Managing product attribute setup
Refer again to the sample catalog we are re-creating in Producty®.

The following product attributes would be required to produce this catalog. (Product attributes are usually listed from left to right across a table such as this.)
- Code (Default Product Code attribute)
- Product Name / description (title not shown in finished catalog)
- Voltage
- Amps
- Trade price
- RRP
By design, each of the products within a collection is configured to display a common set of attributes allowing users to compare similar products. In this example, catalog users will see the same attributes published for the range of Rocker switches.
Assigning product attributes to a category or collection
Product attributes need to be configured to display for a particular category or collection. The display of Category Text Blocks may be configured for a particular category or they will be inherited from a parent recursively up the tree.
To setup attributes for a category or collection, navigate to Category Setup > Product Attribute Setup. Depending on whether product attributes are being inherited or are defined for this category, you will be able to add and remove product attributes from the list.

Link/Unlink attributes from parent
To toggle the inheritance of attributes from a parent, select the Link or Un-Link button found at the bottom of the Product Attribute Setup tab.
If attributes are currently not linked to the category above, the Link button will be displayed.

If attributes are currently linked to the category above, the Un-Link button will be displayed. 
Add attribute to list
To add a product attribute to this category or collection, select the name of the desired attribute in the Add Attribute dropdown found at the bottom of the Product Attribute Setup tab.
Edit attribute properties
Click the Edit button found to the top right of the Product Attribute Setup tab. This will allow you to alter the sort order of attributes and add/edit the width of attribute columns.

Remove attribute from list
Click the Delete button found to the right of the list of attributes shown on the Product Attribute Setup tab.
Removing a product attribute from this list does not delete the actual attribute value stored against this product record, rather it prevents it from being displayed and/or exported.
Worked Example
- Select Manage Catalog from the top menu and click on the Switches & power points category within the catalog tree.
- Click Category Setup from the page tab navigation.
- Click Product Attribute Setup. The Attribute Name Product Code will be displayed.
- From the Add Attribute dropdown, select Product Name.
- Repeat step 3 for attributes Voltage and Amps.
- Click Save to confirm your changes.
Your collection is now configured to display the required attributes.
For more information on managing attribute setup within a category or collection refer our detailed Category Setup – Configure category display including text blocks & attributes guide.
Managing category text setup
Category Text Blocks are used to display text and images at a category or collection level within a catalog. They typically include general information about a whole category or sub-category such as features & benefits or product application photos.
Assigning category text to a category or collection
Category Text Blocks need to be configured to display for a particular category or collection. The display of Category Text Blocks may be configured for a particular category or they will be inherited from a parent recursively up the tree.
To setup attributes for a category or collection, navigate to Category Setup > Product Attribute Setup. Depending on whether product attributes are being inherited or are defined for this category, you will be able to add and remove product attributes from the list.

Link/Unlink category text from parent
To toggle the inheritance of category text from a parent, select the Link or Un-Link button found at the bottom of the Category Text Setup tab.
If text blocks are currently not linked to the category above, the Link button will be displayed.
![]()
If text blocks are currently linked to the category above, the Un-Link button will be displayed. ![]()
Add text block to list
To add a text block to this category or collection, select the name of the desired text block in the Add Text Block dropdown found at the bottom of the Category Text Setup tab.
Edit attribute properties
Click the Edit button found to the top right of the Category Text Setup tab. This will allow you to alter the sort order of attributes and add/edit the width of attribute columns.

Remove text block from list
Click the Delete button found to the right of the list of text blocks shown on the Category Text Setup tab.
Removing a text block from this list does not delete the actual text value stored against this category record, rather it prevents it from being displayed and/or exported.
For more information on managing text block setup within a category or collection refer our detailed Category Setup – Configure category display including text blocks & attributes guide.
Adding products to a catalog
Once you have created your categories and collections and configured your product attributes and category text blocks you can begin to add products to the collections. (These are the products that were created in Item 6 above.)
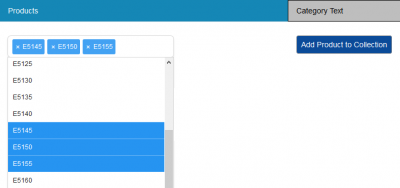
Products are added using the dropdown found to the top left of the Manage Catalog > Products tab. Type the first few letters of your desired Product Code then choose one or more matching products from the dropdown. Click Add Product to Collection to add these products to the current collection.
Worked Example
- Navigate to Manage Catalog and select the Rocker switches collection. (Reminder: Click on the arrow to the left of a category to open up its child category and/or collection.)
- Under the Products tab, start typing “E5145” into the Select Products field. Click on E5145 when it appears in the dropdown list.
- Repeat step 2 for each of the following codes: E5150, E5155, E5160, E5165, E5170, E5175.
- Click Add Product to Collection.
The seven products will now be displayed, along with placeholders for their attributes as specified above.
For more information about the management of products within a collection including how to delete or reorder, please refer our detailed Products- Add products to catalog & manage product attribute values guide.
Editing product attributes
Product display
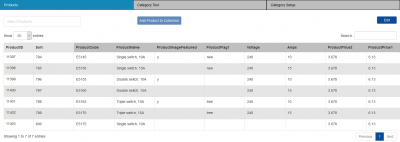
All products contained within a collection may be viewed and edited from the Products tab.
Editing product attributes
Product attributes may only be edited from within a collection. To edit a product attribute click Edit from the Products tab to enable the edit mode. Add or edit product attribute values as required and click Save.
Worked Example
- Navigate to Manage Catalog and select the Rocker switches collection.
- Click the Edit button to enable the editing mode. Product attributes will change from simple text to text boxes.
- Add a value for Amps, Volts and RRP.
- Click Save to confirm.
Product attribute history
Edits to product attributes are logged by user and date/time.
[Producty will soon include a new feature to allow a user to view past product attribute values and to revert to a chosen value.]
Editing category text
Editing category text
To edit category text click Edit from the Category Text tab to enable the edit mode. Add or edit category text values as required and click Save.
Category text history
Edits to category text are logged by user and date/time.
[Producty will soon include a new feature to allow a user to view past category text values and to revert to a chosen value.]
Worked example
-
- While you have the Rocker switches collection selected in the category tree, navigate to Master Setup > Text Blocks.
- Click Edit to the top right to enable the edit mode.
- In the CategoryText field, type “These switches are really awesome. Easy to fix, easy to clean, with groovy coloured inserts.”
- Click Save to confirm your changes.
Exporting to EasyCatalog ready file
Producty features a standardised export format suitable for import into EasyCatalog. This export contains data in a concise, predictable format, allowing EasyCatalog workflow automation to achieved in a standardised and efficient manner. File structure is consistent across different catalogs allowing you to take advantage of pre-designed EasyCatalog panels and libraries offered by Catalog Automation.
[Producty will soon include expanded export functionality will be expanded to allow catalog data to be exported in other file formats.]
Worked Example
- Navigate to Export.
- On the File Format line, check the xlsx checkbox.
- On the Export line, click the Standard radio button.
- Click Export.
Opening and configuring your EasyCatalog panel
This guide assumes already have EasyCatalog installed and know the basics of EasyCatalog setup. Refer Getting started with your automated catalog if you’d like learn more about how to automate your catalog using EasyCatalog.
Download our handy EasyCatalog panel pre-configured for Producty data in our EasyCatalog – Producty Resources pack.
Setting up the EasyCatalog Panel
Unzip the folder you have downloaded from the above link and copy the entire Producty – Sample Panel folder to your EasyCatalog Workspace folder. If you need help finding your EasyCatalog Workspace folder please refer to our separate Managing EasyCatalog preferences article.
Create a new EasyCatalog panel instance by choosing File > New > EasyCatalog Panel > Producty – Sample Panel.
About the pre-configured EasyCatalog Panel
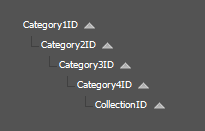
The Producty – Sample Panel EasyCatalog panel contains grouping for your product range.
Loading your data
Once you have created an instance of the Producty – Sample Panel EasyCatalog panel you can load your own data exported from Producty.
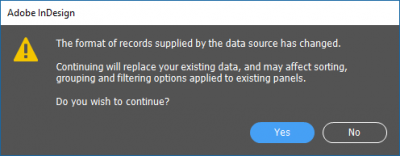
As you will be loading data with additional category text and attribute fields that you have created while working through this guide the following message will display when you load new data.
For more information detailing how to load data to an EasyCatalog panel refer our detailed Loading or updating data in an EasyCatalog panel article.

